How to Start Your Own Website From Scratch | Step By Step Easy Tutorial
It doesn’t matter what business you’re in, what industry you’re in, in order to be successful in a fast tech world of today you will need a website as 76% of your customers are shopping online.
It doesn’t have to be scary, it’s not hard, once you learn how to start your own website from scratch you’ll enjoy it!
You will be able to create as many sites you want.
There are so many businesses out there that spend an enormous amount of money to promote their business and all they have it’s a Facebook page….like, that’s just not enough this year.
If you want to attract more customers and gain a reputation online.You need to build a website.A website that represents your brand,services or product.
Let’s see how can you do that…
Table of Contents
Start Your Own website from scratch following these easy steps.
The first thing you need is hosting (we cover the definition and types here) and a domain name, which is the name of your business, for example, domainname.com, domainname.net etc..
There are tons of options for web hosting out there, it all comes down to your goal.
Are you going for a solid business website, blogging, or a beginner website? Keep In mind that you can always change your hosting provider later on. Your domain name cannot be changed though.
There are free and paid web hosting options we picked and reviewed here, however, in this tutorial we will be using Bluehost because it offers a simple dashboard,it’s easy to use and manage(one click install type of tools) and it is affordable for the large range of services they offer.
As you might know, shared hosting is the cheapest solution, the basic plan is the best one for a starter.
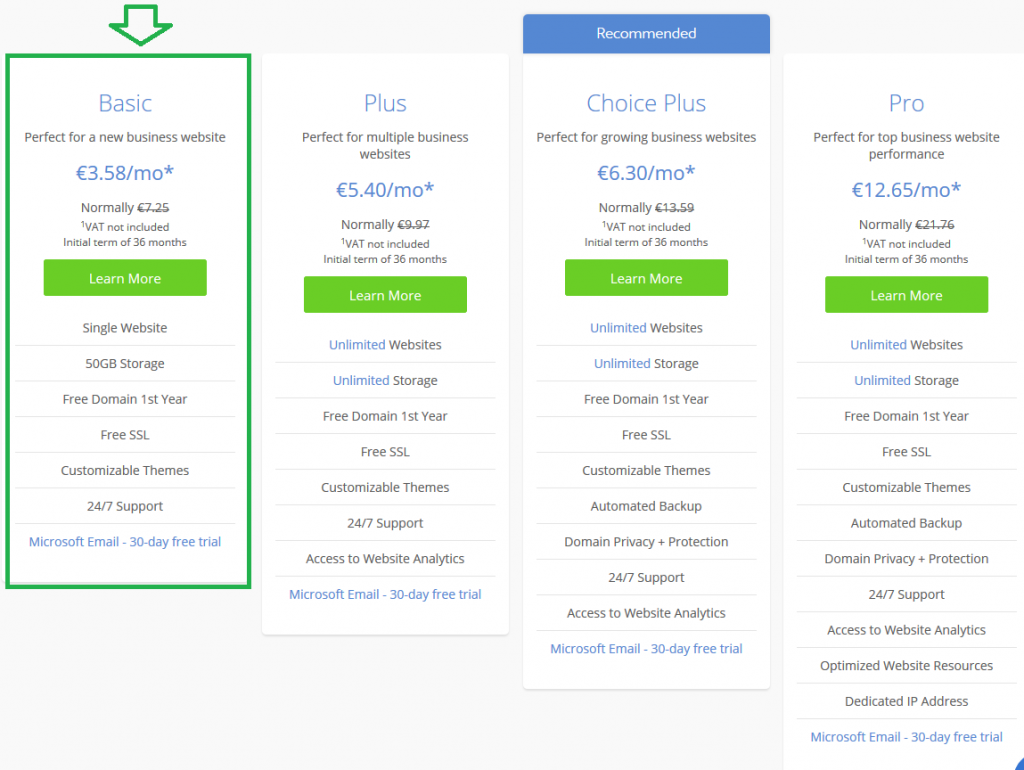
These are the Bluehost available shared plans. Now when you first start I suggest you go with the basic, you can always upgrade later on.
So as you go at Bluehost, it might look overwhelming as you’ll see a bunch of options, but don’t worry, ignore all that, we will show how to get started step-by-step.
Step 1. Select “Get Started” or from the drop-down menu hover over the Hosting option and select Shared Hosting.
Step 2. Next, chose the basic plan, this option is the easiest to start with and it is tailored for beginners.
With the basic plan, you get to build one website which is fine for now, customer support is available for you 24/7( they are really kind and helpful), free SSL certificate which is required in order for Google to show your website secured for payments and your first domain name is free for the first year.
Choosing Your Website Domain Name
 You can create a domain name with Bluehost or if you need some great domain ideas to use, go at Flame Domain. Flame Domain is a free platform used by millions of people to find a good domain name.
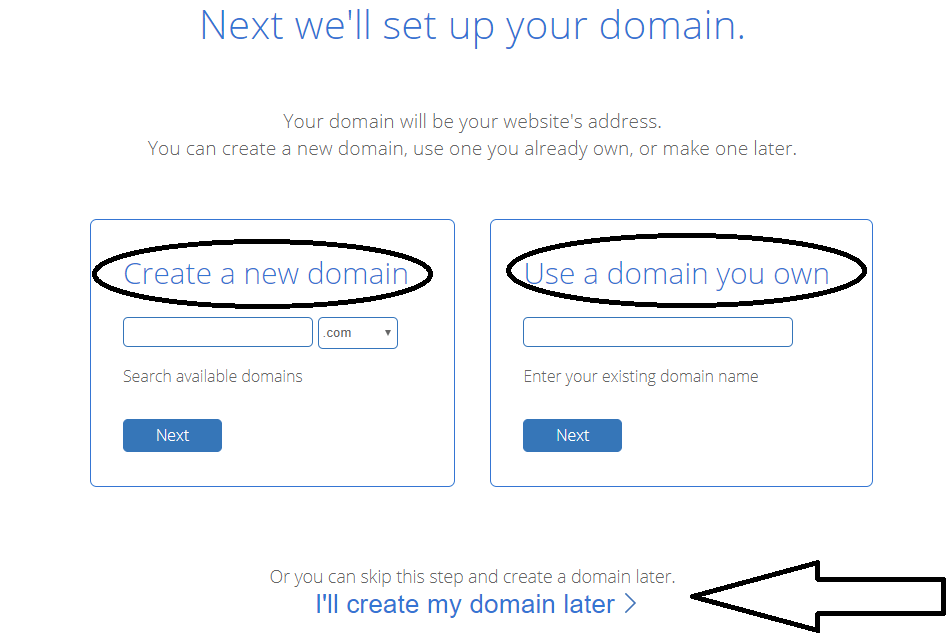
Step 3. You can register a brand new domain or use one that you have already purchased with a different provider.
A domain name is important part because it tells a customer what is your website about, e.g. if you’re in a niche related website then you should use a word that express your industry, like for example:
- tinypng.com (compress PNG images)
- Gmail.com (e-mail platform)
- DropFunnels.com (funnel niche)
- onlinetraining.com (online tutorials)
- fitnessmagazine.com (fitness niche)
You get the point, the sooner a person can relate your domain name to what they are searching for, they are more likely to click on your link.
Don’t overthink it too long, the right name will show up.
If you already own a domain name then BlueHost will transfer it over in no time. It’s easy to do, there is a Knowledgebase available that you can access as well.
To learn how do this go to “how to transfer your domain name to BlueHost“,or ask their support to do it for you.
Moving on to the next step…
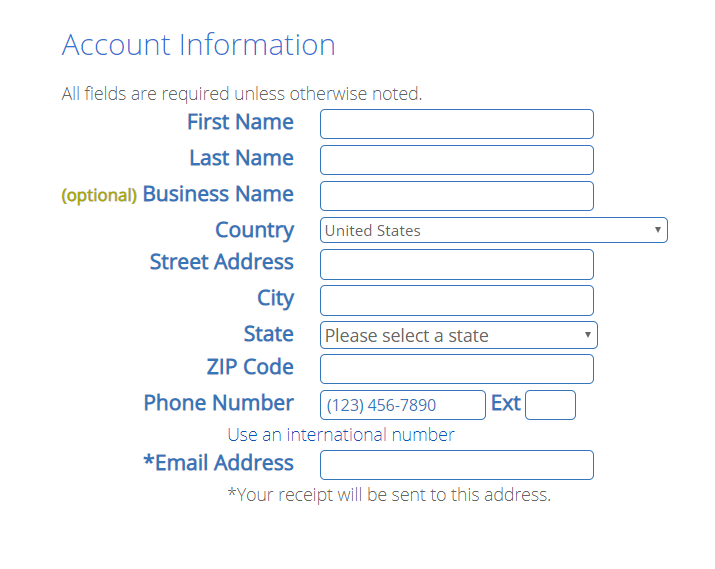
Step 4. Once you’re done with the domain name you’ll be redirected to the information registration and purchase plan details page.
Here you are required to fill in your information like name, country, address and pick a plan.
Add Your Personal Information
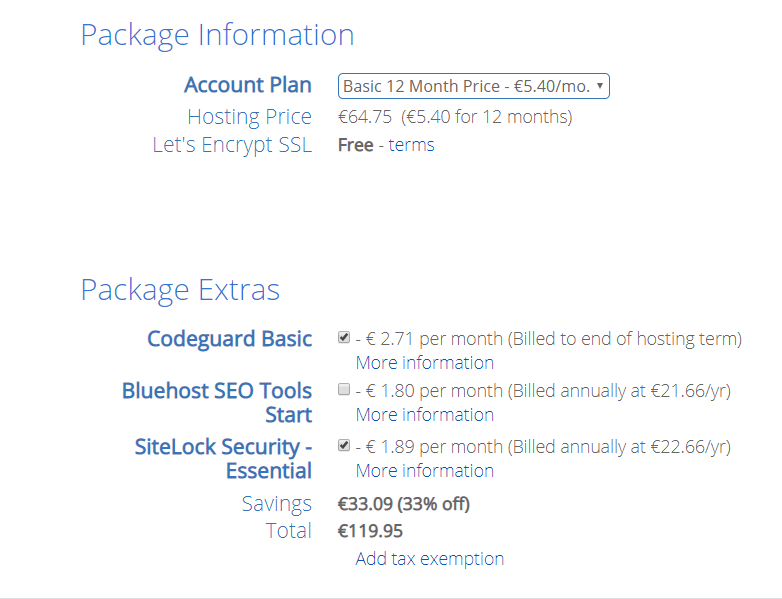
Then proceed to the plan information, in the package information section pick a plan that suits you best for now and upgrade later, uncheck the boxes in the package extras section, for now, you can change these settings later on from your dashboard.
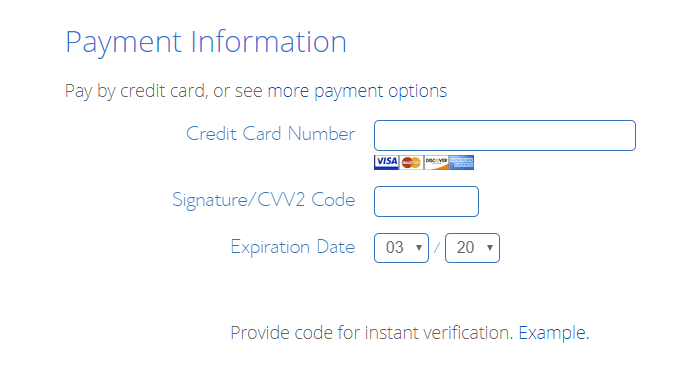
Next, add your payment details and make a payment. As you start, go with the cheapest plan and start creating your website.
The long-term plans are good too as they offer more options, but let’s start with this one instead, so you won’t get too confused.
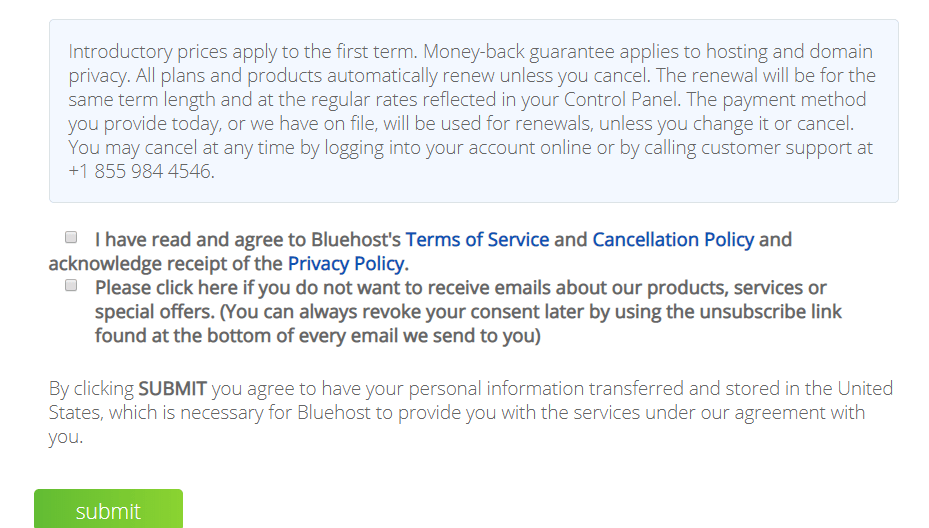
Before you proceed you need to agree with BlueHost’s Terms&Condition and Policies, as well as subscription preferences. Make sure you read these statements carefully so you will know what to expect.
The whole process shouldn’t take you more than 5 minutes.
Installing WordPress with Bluehost
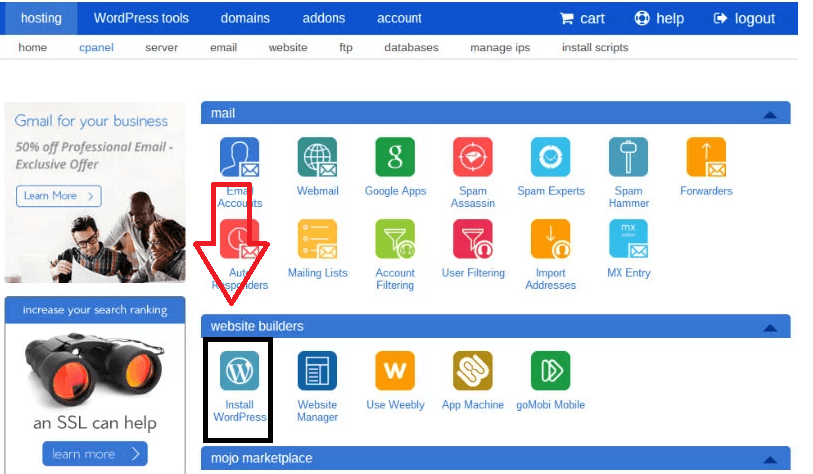
Step 5. After submitting, the WordPress installation is pretty easy. Within a few clicks, your WordPress dashboard will be ready.
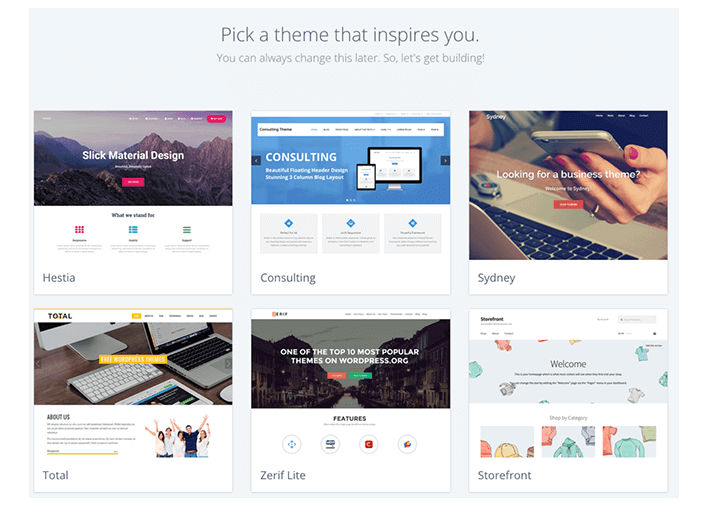
Afer that you will only need to set up your password and choose a theme.
Don’t stress too much about a specific theme just yet, although it’s important, pick a theme to get you done with the initial setup and get you out from the maintenance zone.
There are tons of free themes you can select from,like Hestia a fully customizable theme, but it all depends on what is your website about, like a blog, e-commerce or service.
There are loads of customizable themes that match your niche. You can alway use a drag & drop website builder like Elementor, or a vizual builder like Divi.
Step 6 is on you…once you select your theme, you are ready to start adding your own content.
You can now start filing your new website with content that “speaks” your brand.
If you proceed with WordPress,all the options are available for you on the right panel, otherwise you can simply use your BlueHost’s panel, which is as simple to use.
With WordPress you can add more elements and plug-ins.
If there’s something you need to ask, remember that BlueHost’s support is at available 24/7, they can even complete a task on your behalf.
To have a better understanding of WordPress “world” and how it works, here’s a short review on this popular software.
Read about the differnce between WordPressdotcom and WordPressdotorg here.
Howver, let’s assume we’re going with WordPress…
Step 7. Your WordPress dashboard is installed and all you have to do is choose a theme,add content and go public and start adjusting a brand new website.
Welcome to your WordPress dashboard!
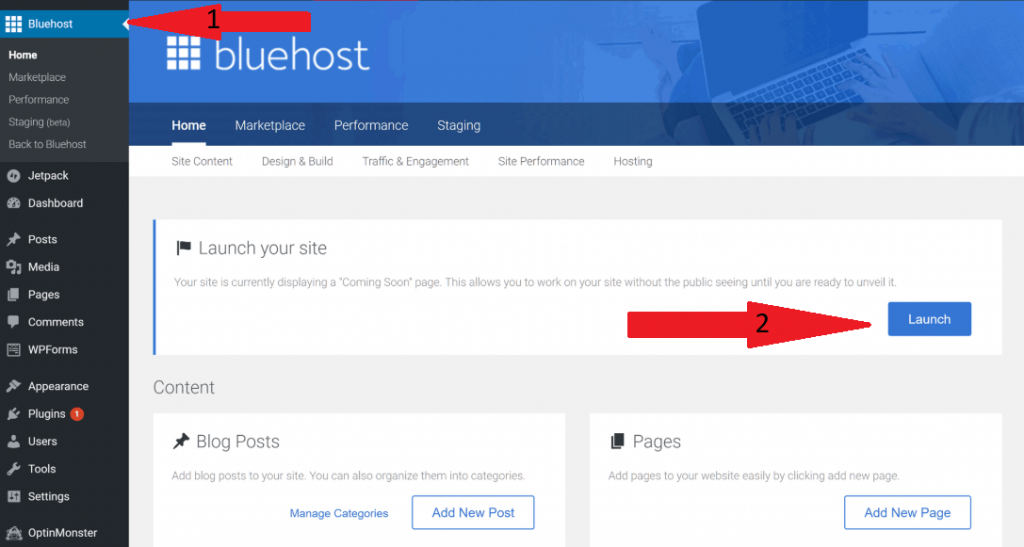
Step 8. Now select the BlueHost option, Home and finally launch your site.
Now you’re site will go public but we have to start designing it and add our content.
After launching the new website, you will be taken back to your BlueHost dashboard, where you have access to the options available to you, like “your sites”, “live chat” or “browse themes and plugins”, change your profile details and other options.
If you’re going to build a blog, from your WordPress dashboard head over to Posts>Add New and start writing your article. After you’re done writting select category(if its the case),add a featured image,tags and click “Publish”.
Your first article is live!
You can select home icon at the top-left to view your site.
As with other softwares,the WordPress side-bar has all the options you need to configure and manage your site, most of the other details are self-explanatory here, Add New Post, add media(photos and videos), create pages, split your content into categories, see and edit comments. From the “Appearance” tab manage your themes,menus,background, add widgets(if your theme supports) or if you know how edit your theme(be sure you know what you’re doing here-this is your site html-php-css configuration).
Let’s get to design
Step 9. If you want to start building a website using free page builders, which is the easiest and fastest way to create a website, there are a lot of free options or you can choose to download from plug-ins by going to the Plugins section>>Add new>>Download.
What easy page builders should I use?
Elementor is one of the easiest drag & drop,popular page builders, with a lot of options, easy to use blocks, gradient colors and much more, you can even download their additional plugins like Elementor Additional Add-ons, Essential add-ons for Elementor and Premium add-ons with extra premium options.(Read my review for Elementor.)
With this plug-in and its add-ons you don’t need a theme, you create a whole website in just few minutes,add everything you want like videos, charts, costum blocks, save your favorite blocks and re-use them plus much more.
Note: Make sure it’s compatible with your WP version-check the bottom of the plugin description.
In the meantime,you want to download a plugin called Updraft and use the free version,you want to backup and save or download your website. That way you know your website will never be in “maintenance” mode due to errors and you won’t need to re-create your site.
After setting up your site, you want your contents to be found by search engines like Google or Bing.
For ranking in search engines, you have a series of free SEO tools available, you can download from the Plugin section. Or use a separate keyword tool help you rank better.
Note: keywords are important and content is king! Make sure you create valuble content and most important relevant to your niche.
Step 10. Use keyword tools to diversify and create content that your customers are searching for.
Check out some reviews on the best keywords researcher and Search Engine Optimization tools:
- All In One SEO Pack Plugin Setup [updated for 2020]
- Google Keyword Planner Review | Keyword Planner Tutorial in 2020
- SEMRush Review | What is SEMrush and Why Should I Use It
- What is Ahrefs and How to Use it
- My Review On Yoast SEO | Step-by-Step Setup Guide
Step 11.As for your images, you should consider using a WP plugin, tinypng.com, a free tool that compresses images while preserving their transparency.
This way you won’t take to much space(bandwidth) or need to delete any of your media content.
However, if you still want some free popular plugins here are some options:
- Smushit – Compress, Optimize and Lazy Load Images
- EWWW Image Optimizer
- Imagify –Convert WebP, Images Compression, and Optimization
Step 12. Next, from the “Appearance”tab you can play around and change fonts, colors, sizes and more.
Note:use images & SEO plugins for maximum optimization and ranking.
That’s it,you’re pretty much done creating your site.Let me know in the comments how you did!
If you want to know more abou BlueHost’s connection to WordPress,
Read this article here: Why WP loves Bluehost? Facts about a Powerful Web Hosting
With so many hosting companies it might be challenging to make a perfect first choice. But with most of them the procedure is the same(buy a plan>start building).
There are some articles here reviewing top hosts such as Amazon AWS, HostGator, A2Hosting, GreenGeeks, NameHero or Liquid Web to name a few or go for free& affordable hosting.But basically these are the steps to follow configure and start creating a website online.
Hope you enjoy the post!
Thanks for reading!

